lunch & snacks

Braai Broodjies for Heritage day + a prize!

Braai Broodjies for Heritage day + a prize!
IMG_4236.jpgBraai Broodjies for Heritage day + a prize!
Braai Broodjies for Heritage day + a prize!
IMG_4164.jpg
Braai Broodjies for Heritage day + a prize!

Heritage day is around the corner and I have paired up with Netflorist to give away an awesome prize. It is proudly South African and it is perfect for the man in your life! Netflorist caters for all occasions, not just the one’s we remember such as heritage day! Read to the end to see the giveaway. 
I am a braai loving gal and pride myself on my ability to cook with fire. I have my father to thank for that! 
All the countless braai nights and fire builds were not in vain! 

I decided to share a fun recipe that is not only delicious but also gives you a great vegetarian option for braai day. Whether you choose to snack on it or make it the main event, that’s up to you. 

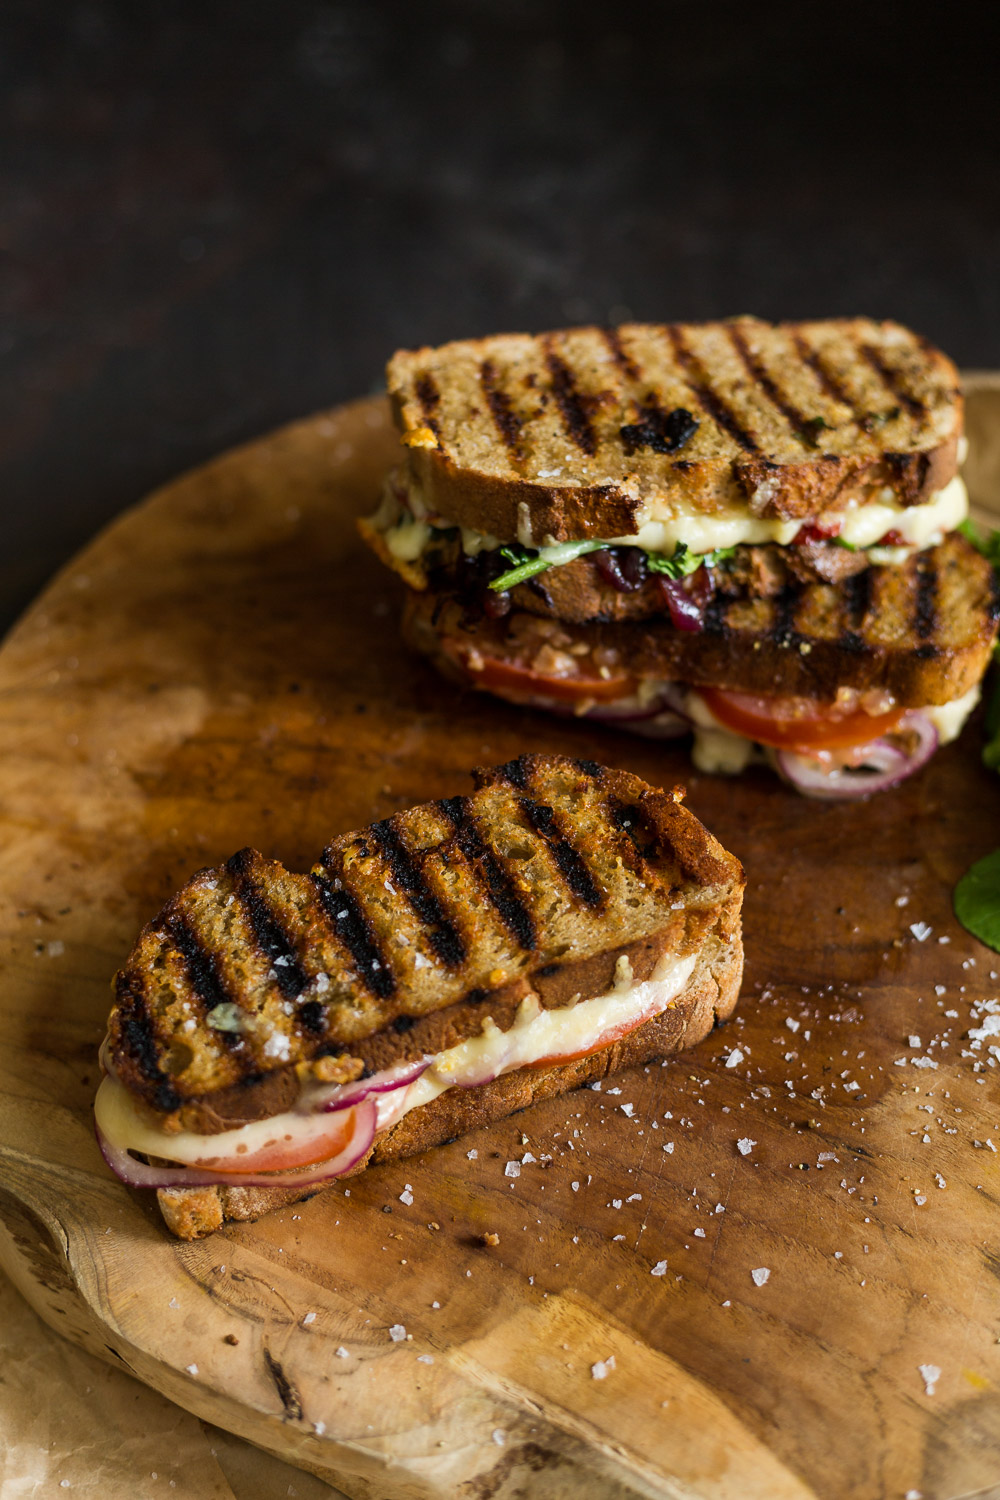
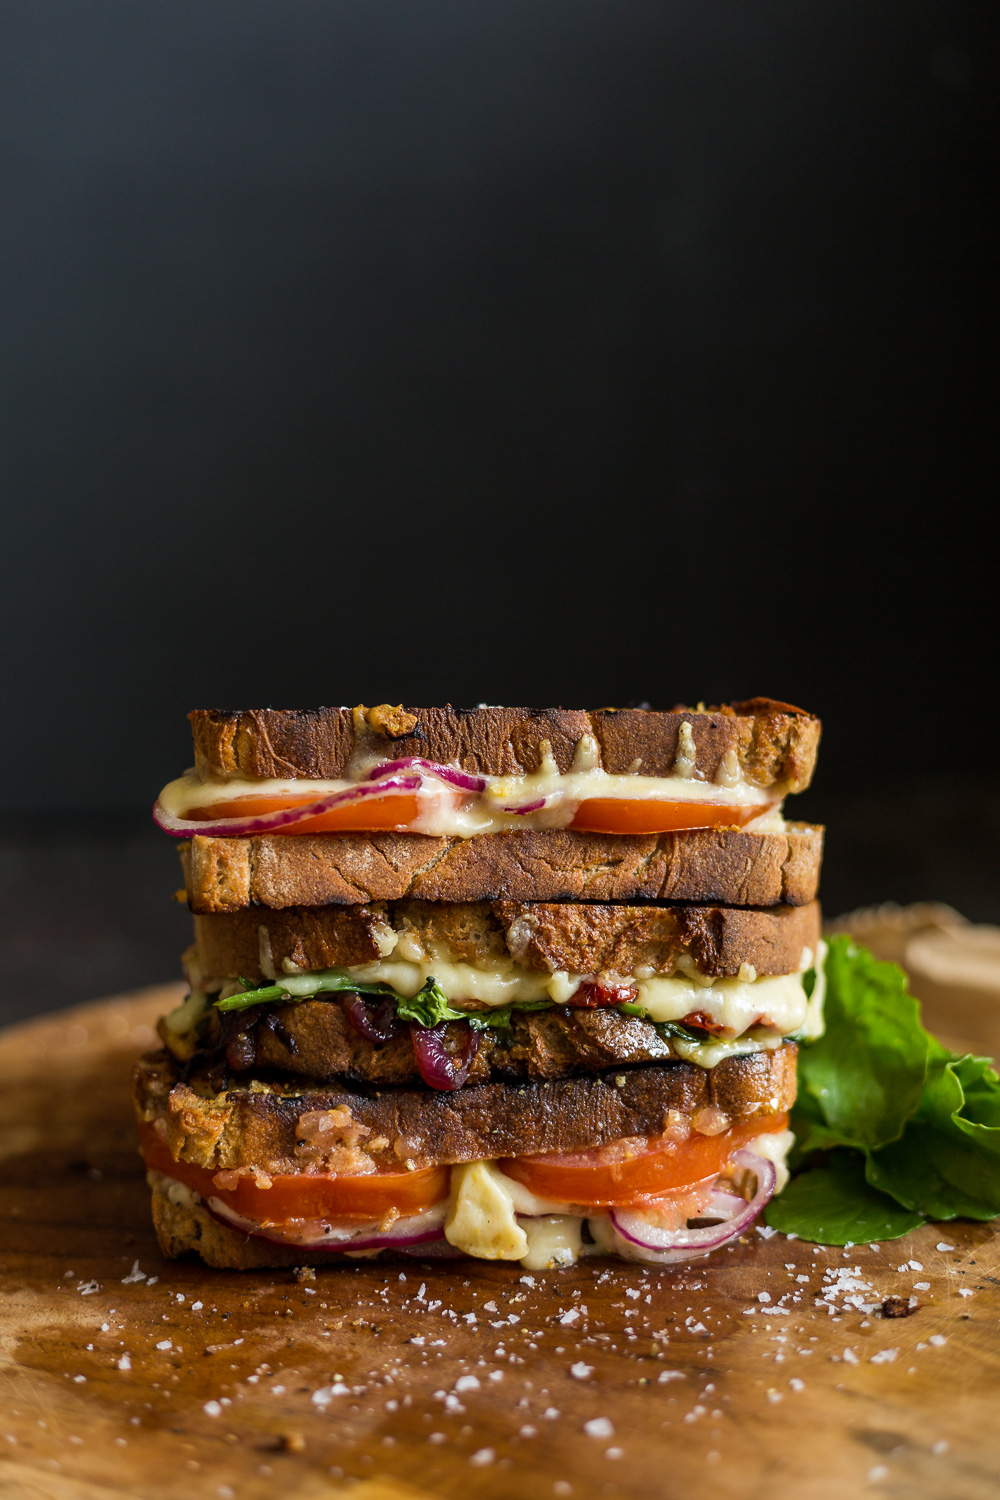
Braai broodjies (BBQ toasted sandwiches) are one of my favourite things at a braai. I mean, let's be honest, cheese on fresh bread flamed to perfection is heaven. These are no different. I’ve shared a basic cheese and tomato because I feel everyone needs that in his or her arsenal and I have also shared a slightly more fancy one. The secret is in the quality cheese and bread so try and find great sourdough that has been freshly baked and melt in your mouth good cheese. 


Serves 5

Ingredients: 

1 teaspoon coconut oil
1 large red onion, sliced
1 loaf sourdough
200 grams butter
1 tablespoon Dijon mustard
250 grams Raclette cheese, grated
250 grams Boerekas or mature cheddar, grated
1 plum tomato, sliced
4 tablespoons balsamic vinegar
1 handful fresh rocket
100 grams sundried tomatoes in olive oil
Salt and pepper 


Instructions:

In a medium frying pan over a medium heat add a teaspoon of coconut oil. 
Add 3/4 of the sliced onion and gently sauté until soft. Add the balsamic and reduce until the onions become sticky. Once ready set aside. 

Slice the sourdough into even 1cm think pieces. 
Butter both sides of each slice generously. 

Now it is time to build the sandwiches. 
Start with a smear of Dijon mustard. Then add a generous amount of both kinds of cheese. 
For half the toasties add a layer of the fresh onion that you saved. Then add the fresh tomato. Close the sandwiches.
For the other half add the sundried tomatoes and the balsamic onions. Top it with the rocket and close the toasties. 
Season the toasties and they are ready to cook! 

Add them to the braai when the fire is hot. I like to add mine to the side so that they do not burn and get a chance to melt. Once the toast is golden and the cheese has melted, about 6 minutes, they are ready! 

Feast! 

***Competition closed

Prize time: I am giving away a custom engraved biltong slicer to one lucky reader! 

Braai Broodjies for Heritage day + a prize!

All you have to do is comment below with your best braai memory and follow both Netflorist and me on Instagram and you could win! T's and C's apply. Competition for South African residents only. Entries close 21st September at 12 noon. Prize not redeemable for cash. 

Instagram handles:
@netflorist
@trufflejournal

-Melissa 


Kale Parmesan Chips

Kale Parmesan Chips

Crunch is the ultimate texture in my world. I find it utterly satisfying. I used to be obsessed with crisps that are unhealthy, oily and didn't offer any nutritional value. Once I figured out that it was the crunch I was after, I started to shift what I saw as a snack. I decided to rather go after tasty, crunchy snacks that are high in nutritional value and don't leave me with guilt after eating empty calories. A nutritional snack will also leave you satiated rather than hungry 20 minutes later. Making mindful decisions on snacking has been one of the best things I have done to support my decision in leading a healthier lifestyle. 

These kale chips are easy to make and are a fun way to use the dark green leaf. You can play around with toppings. If you are vegan why not try mixing them with some toasted pumpkin seeds and hummus for dipping? 


*Serves 4

Ingredients:

  • 1 bunch kale, stalks removed 
  • 2 - 3 teaspoons coconut oil
  • salt
  • ¼ cup parmesan, finely grated

Instructions:

Preheat the oven to 180°C.

Tear the kale leaves into bite sized portions and place them onto a roasting tray. Massage all the leaves with coconut oil until they are evenly coated. Spread them evenly on the roasting tray and crack some salt over the top.

If the roasting tray is full, rather spread the kale between two trays to give the leaves space to roast without steaming, otherwise, they’ll get soggy rather than crispy. Pop them into the oven and roast for ten minutes tossing them at the halfway point. Once ready, sprinkle with some grated parmesan and serve.

Food Tip:

Parmesan is the ultimate umami flavour and a light sprinkling can help to elevate a dish. After all, umami means yummy!

-Melissa 


Fish tacos with grilled nectarine salsa

Fish and grilled nectarine tacos

I'm baaaaaaack!

Hi, guys! I am so sorry I have been so quiet around here. Things have been really crazy my side and I have been shooting up a storm. Unfortunately, that has meant that I haven't been able to hang around here with you guys and share all things delicious with you. I thought now would be a good time to make it up to you by celebrating Taco Tuesday. This is a gorgeous recipe that I am obsessed with. It is a wack of sweet, salty and of course my favourite texture, crunch.

Hopefully, you will celebrate Taco Tuesday in style with some tequila and after two or three (because who has one?), you wouldn't have noticed that I have been M.I.A.

I promise to be better and share more recipes with you guys as soon as my schedule slows down.


Makes 10 Tacos

Ingredients:

  • 3 nectarines
  • 500g white Fish
  • coconut oil
  • 1 box taco shells
  • 1 lemon
  • salt and pepper
  • 1 large avocado
  • 1 green pepper
  • ½ red onion
  • ½ cup coriander, roughly chopped
  • olive oil
  • lemon
  • ½ red chili, finely chopped
  • salt and pepper 
  • 2 fresh lime to serve 

Instructions:

Preheat oven to 180⁰C

Set a Grill pan on medium to high heat.

Cut nectarines into twelve segments and toss in a teaspoon of coconut oil. Grill them on each side until beautiful and tasty griddle lines appear. Set aside to cool.

Trick: the nectarines are easier and less fussy to turn if grill pan is very hot and the charred lines are well formed. This goes for anything made in a grill pan!

For the salsa:

Chop up avocados, red onion, green pepper and a few slices of the nectarine into the same size cubes and mix together.

Add coriander, a splash of olive oil, a squeeze of lemon juice and season to taste.

Cut fish into one inch thick fingers, toss in a little coconut oil, season and fry until golden on each side. About two to three minutes on each side.

Pop the taco shells on an oven tray and into the oven for eight to ten minutes. This will make them nice and crunchy!

Building the Taco:

Layer slices of grilled nectarines, the fish, salsa and lastly top with a sprig of coriander and a good squeeze of lime

-Melissa .


Beer steamed mussel pot

Beer steamed mussels pot

Living in a world of social media really has its ups and downs. It is so hard to not compare myself to others (a huge mistake) and it is all too easy to fall into a space of dissatisfaction with my own life after viewing someone else's best day on Instagram. However, I constantly remind myself it is just that. Someone's best day. They are working hard to create top class content (as do I) that although beautiful, is not a true reflection of the reality we live in.

I find it inspiring to see people travelling the world in a (seemingly) real life re-enactment of Gulliver’s travels filled with adventure and wanderlust. 
I find myself going down these rabbit holes and ending up pouring over these beautiful locations for hours on my phone. 

Possibly not an ideal habit for a busy woman. Or her partner.

Recently, my obsession has been centred over island vacations. I mean, who’s imagination isn’t captivated by the thought of unspoiled paradise? 
Picture it; Soft beach sand between your toes, a warm sun kissing your shoulders with a fabulous cocktail in hand.

Sigh. 

In an effort to cure my island blues, I decided to come up with an easy-to-make, simply delicious seafood recipe. 
The mussels are a taste of the ocean and the beer offers a signature hop bitterness to contrast the honey in the recipe. The chilli adds a well placed kick and voila - you have yourself a mini vacation in your mouth! 

So if you find yourself dreaming of a magnificent blue ocean somewhere, sitting on a beach sipping on a coconut - I hope this will help you in adding some texture to those imaginings.


Serves: 4

Ingredients: 

  • ½ brown onion, chopped
  • 1 tablespoon coconut oil
  • 1 garlic clove, minced
  • ½ red pepper sliced
  • 2 red chilies, finely chopped (optional)
  • 1 teaspoon honey
  • 500g of the best quality mussels you can find
  • a handful of coriander
  • 330ml beer
  • 1 small baguette
  • herb butter

Instructions:

Preheat oven to 200 degrees Celsius.

Defrost the mussels and put them in the fridge until you are ready to work with them.

Slice the baguette and butter both sides. 

Take a medium frying pan over a medium to high heat, add a tablespoon of coconut oil and the onions. 

Fry the onions until soft, about 5 minutes.

Add the garlic, red pepper and chili and fry for a further 5 minutes. 

Add 1 teaspoon of honey and fry for a further minute. 

Add your mussels to a cast iron pot, if you don’t have one any oven-proof dish with a lid will do.

Add the onion and red pepper mix on top of your mussels

Once everything has been added to the pot top with 330 ml of beer and seal the pot.

Pop the mussels into the oven for 20 minutes to steam, or until the shells begin to pop open.

For the last five minutes add the baguette to the oven until toasted. 

Serve hot and enjoy with even more beer! 

-Melissa


Beetroot tart tatin

Beetroot tart tatin
0L8A5263.jpg
Beetroot tart tatin
Beetroot tart tatin
Beetroot tart tatin

I first stumbled upon beetroot tart Tatin at the amazing The Table restaurant. This fantastic spot, found on De Meye wine farm is one of my favourite places to eat in Cape Town. The entire concept is organic farm to table and although you’ve heard it all before, this time it truly is... The beautiful garden is just two years old and filled with amazing vegetables, fruits and berries. They use as much fresh produce from the garden as possible. 
The restaurant quips that the garden is out of their control and they wouldn't have it any other way. 

Sometimes things grow successfully and sometimes...well... not so much. 
I know this to be true because I have undertaken a small garden on my balcony here at home and I must commend them for their successes because they don't always happen. 
In fact; I find it more of a miracle when magic does eventually happen on my small balcony.
Having the sweet satisfaction of eating something home grown is simply the best! 
It’s organic, healthy and a true labour of love. Now, who wouldn't want to put that energy into your body? 

Each week they select their vegetables from the garden and source the rest from local farmers and then formulate the menu for the weekend. 
The food is mouth watering and I have never tasted a beetroot tart Tatin like I did that day. 
All the dishes have an element of farm comfort to them and are served on unique antique style platters. 

You can sit under the trees and feast family style, which might I add is my favourite. 
More is more and of course, De Meye wine is the perfect complement to the feast at hand! 

Bookings are essential! Click here to book. 


Ingredients: 

8 medium sized beetroots, (I mixed it up and got candied beets.) Cooked and peeled. 
1 large red onion
4 sprigs of lemon thyme (you can use normal thyme)
3 tablespoons brown sugar
4 tablespoons butter
5 tablespoons balsamic vinegar
sour cream to serve
salt and pepper

For the shortcrust pastry:

200g plain flour
125g chilled butter sliced into cubes
1/2 teaspoon salt
1 large egg
3 tablespoons cold water 

OR you can use Puff Pastry store bought, same as The Table (Which I must confess is perfection.) Don't forget you will need an egg to egg wash the pastry! 


Instructions:

In a large bowl mix the flour, salt, butter. Using your hands rub the flour and butter between your fingers until the dough is crumbly. Make a well in the center and add the egg and water. Mix well until the dough forms a soft ball. If the dough is too sticky then you can add flour if needed. Wrap the ball in cling wrap and put it in the fridge until you are ready to use it. 

Preheat the oven to 180 degrees celsius.

Remove the skin from the beetroots and slice them into 1cm thick discs. 
In a large frying pan over a medium to high heat add the beets, red onion, butter, and sugar. Fry for 12 minutes until it starts to caramelize. Add the balsamic and thyme and fry for a further 2 minutes until the sauce becomes glossy and beautiful! Don't forget to season the beets! 

Now to assemble your tart! 

Grease a round cake tin. A 20cm size will do. 
Layer the beetroots in the cake tin so the surface of the tin is entirely covered. You can layer them like fish scales. Make sure you do this nicely as it will be the top of your tart when inverted. Add the red onions and sauce. 

Using a rolling pin roll out your dough until you have a disk big enough to cover the beets and tuck it in on the side, then prick it with a fork.
If you are using puff pastry, do the same and brush the pastry with a whisked egg. The tart will be inverted so make sure you tuck it in nicely! 

Bake for 30 minutes in a preheated oven or until golden brown. Leave to cool for ten minutes before turning it out gently. Serve on a beautiful dish with a healthy dollop of sour cream! 

-Melissa